This post may contain affiliate links, which means I may earn a commission for my recommendations at no additional cost to you. By browsing this website, you agree to our privacy policy and terms of use.

Learn the easiest way to make a 3-Ingredient Pie Crust from scratch for all of your sweet and savory homemade pies. It's perfectly flaky, ultra buttery, and simple to make with just a few pantry staples.
The Perfect Pie Crust Recipe
I do a fair amount of baking from scratch because it is:
- Better for you (no icky ingredients and preservatives you can't pronounce)
- Usually cheaper
- Significantly better tasting
But I will be honest. I almost always used pre-made pie crust until recently for it's convenience. Something about making a pie crust from scratch sounded overly complicated.
Not anymore. I've developed the perfect pie crust recipe that you can make with just 3 ingredients and very little effort. Better yet, you'll get two pie crusts out of this recipe. Great for a double crust pie or baking a few pies during the holidays (aka pie season).
Follow my simple steps and tips and get ready to experience the easiest pie crust that's also easy on the wallet. This homemade 3-ingredient pie crust recipe is cheaper than Pillsbury's refrigerated pie crusts at my local Walmart!
The Ingredients You'll Need
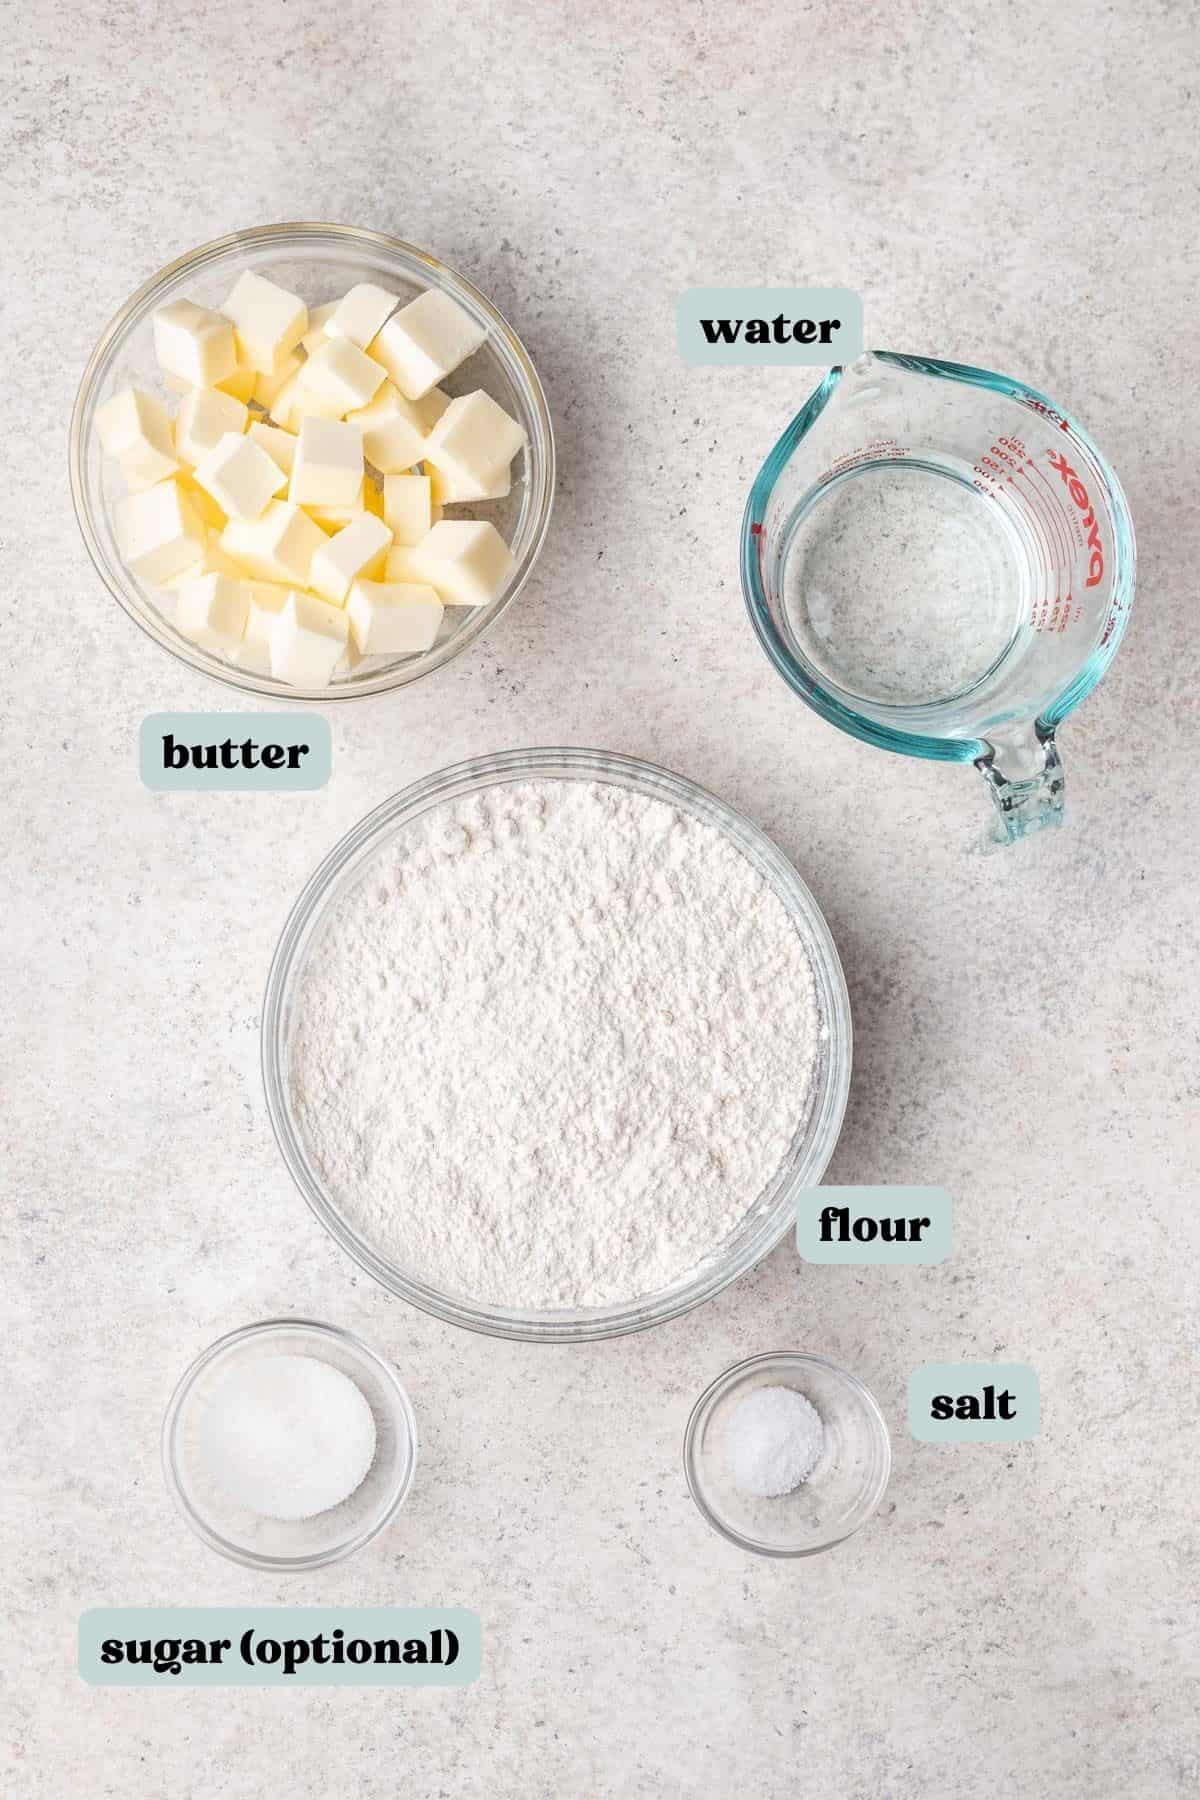
If we're getting technical, I like to make this easy pie crust recipe with 5 ingredients:
- Flour
- Unsalted butter
- Water
- Salt
- Sugar
However, the sugar is optional, and when you use salted butter, all you need is:
- Flour
- Salted butter
- Water
Ingredient Notes and Substitutions
- Flour – For the best, flaky pie crust, please use an unbleached all-purpose flour. I have not tested this recipe using any other flour and cannot recommend substitutions. Please do not use a gluten-free flour blend and expect your pie crust to have the same flaky texture.
- Butter – I typically like to make this butter pie crust using unsalted butter because it is most consistent across brands. With that being said, salted butter does work and allows you to omit the added sea salt. Additionally, this recipe works with dairy free butter, but you must use dairy-free buttery sticks, NOT butter spread or margarine.
- Ice cold water – Emphasis on the ice cold! This keeps the butter from melting and yields the best, flaky pie crust.
- Salt – If using unsalted butter, a pinch of added sea salt is necessary. Avoid kosher salt or large flake salts. They won't blend well into the pie dough.
- Sugar – Adding a bit of sugar is completely optional, but does help to encourage the crust to brown and become a beautiful golden brown.
Recommended Tools
These links are affiliate links to products I recommend. This means I may make a commission from your purchase through this link, without any additional cost to you.
- Pastry cutter – I resisted purchasing a pastry cutter for a long time time, but now that I have one I understand how absolutely crucial this tool is to cutting butter into dough. It creates the perfect pea-sized pieces without adding the warmth of your fingers to the dough. It's the perfect tool for making homemade pie crust, biscuits, and scones.
- Food processor – If you're set on a minimalist kitchen and don't want to purchase a pastry cutter (very reasonable if you don't bake from scratch often), invest in a quality food processor. This is my favorite way to make buttery doughs without a pastry cutter as it cuts the butter into the dough similarly while helping to keep it COLD. I've owned this particular food processor model for nearly 10 years and it's still going strong.
- Pastry mat – While you can absolutely roll out your dough on a cold kitchen counter, I prefer to use a pastry mat because it provides a helpful visual to know how many inches your dough is rolled out to.
- Bench scraper – My favorite tool for cutting the dough in two and moving the dough without touching it with my hands (the more you touch the dough with your hadns the warmer it gets! Too warm = no flaky crust!)
- Rolling pin– I love these extra long rolling pins. They make it very easy to wrap the dough around without any issue.
- 9-inch Pie Plate – If I have the choice, I am picking a ceramic pie dish over glass any day of the week! Ceramic heats the crust more evenly and cools down more quickly.
- Pizza cutter – particularly helpful when making lattice pie crusts!
- Pie weights – If you are making custard pies, quiches, chicken pot pie, pies with juicy fillings like fruit pies, or banana cream pie, you'll likely need to blind bake the crust before filling. Pie weights are essential to preventing the pie crust from puffing up and creating air bubbles in the bottom. If you don't bake often, or are on a strict budget, skip the pie weights and simply fill the parchment paper lined crust with dry beans.
- Pastry brush – I've used pastry brushes made with quality boar bristles, but always favor my silicone pastry brushes. No matter what, I find boar bristles to shed, which is obviously not ideal when it comes to baking food, particular for guests. Silicone brushes never shed and are just as easy to use when brushing an egg wash on the top crust.
How to Make Pie Crust with 3 Ingredients
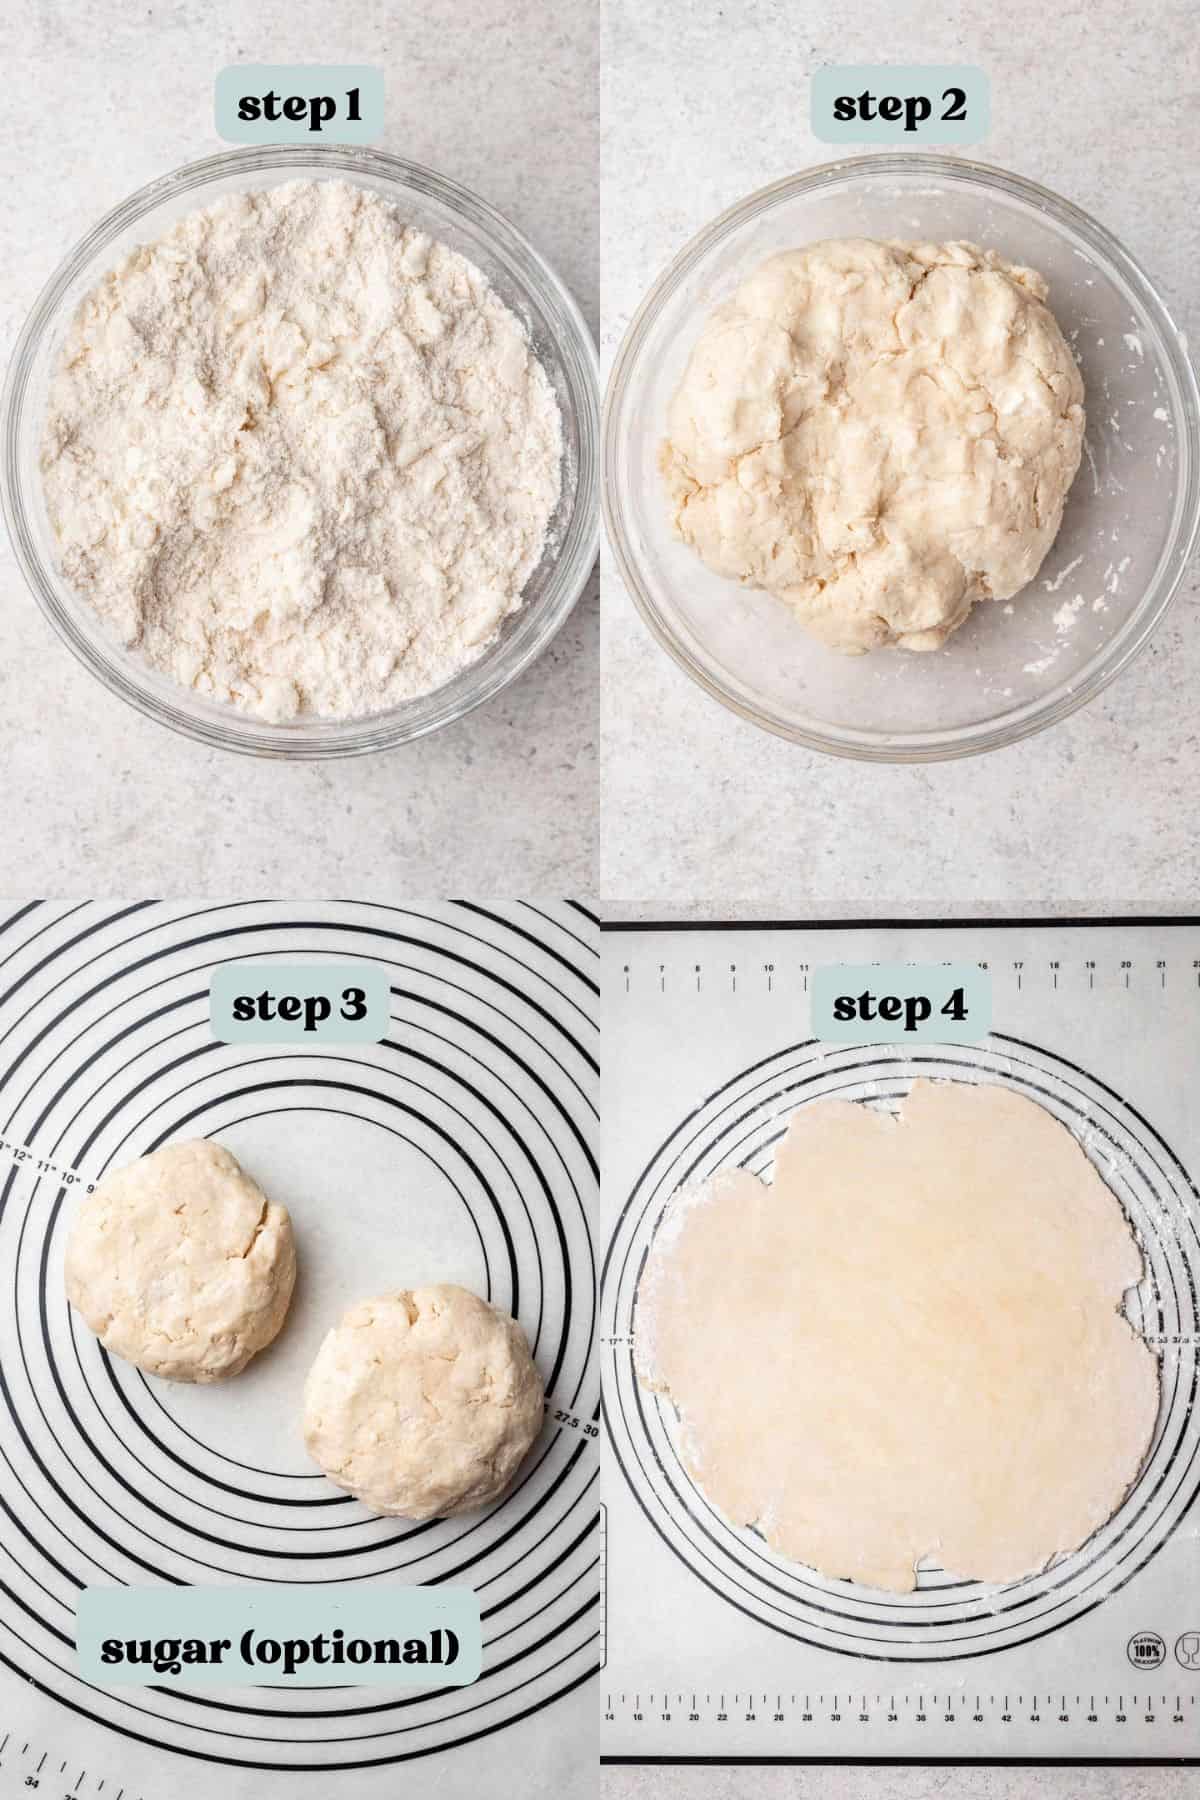
- Mix the dry ingredients. In a large bowl, combine the flour, salt, and sugar, if using.
- Cut in cold cubes of butter. Add the cubed butter to the bowl, then using a pastry cutter, cut the butter into the flour until the texture resembles sand. A few larger pieces are okay, but you want it to be otherwise well dispersed.
- Add ice water. One tablespoon at a time, pour in the ice water. Using a wooden spoon or spatula, mix to combine until a crumbly dough forms with flecks of butter throughout. It should feel moist, but not overly wet.
- Form into a dough ball. Turn the pie crust dough onto a clean work surface and gently work together with your hands until the dough comes together into a ball.
- Cut into 2 discs. Divide the dough into two even discs and wrap each in plastic wrap.
- Refrigerate overnight. Place the 3-ingredient pie crust dough into the refrigerator and chill overnight or for an absolute minimum of 1 hour.
How to Roll Out Pie Dough
- Roll the pie crust 1/4″ thick. After the dough has been sufficiently refrigerated, sprinkle a work surface with flour. Roll the chilled dough into a 12″ circle, about 1/4″ thick. This is easiest to do if you start with the rolling pin in the center of the dough, then roll out in all directions, turning the rolling pin as you go.
Tip: You want to work rather quickly to prevent the dough from becoming overly warm. If you find the dough is too warm or the butter in the dough is melting, lift the pie crust and place it on a parchment lined baking sheet. Refrigerate for about 15 minutes to chill, then start again.
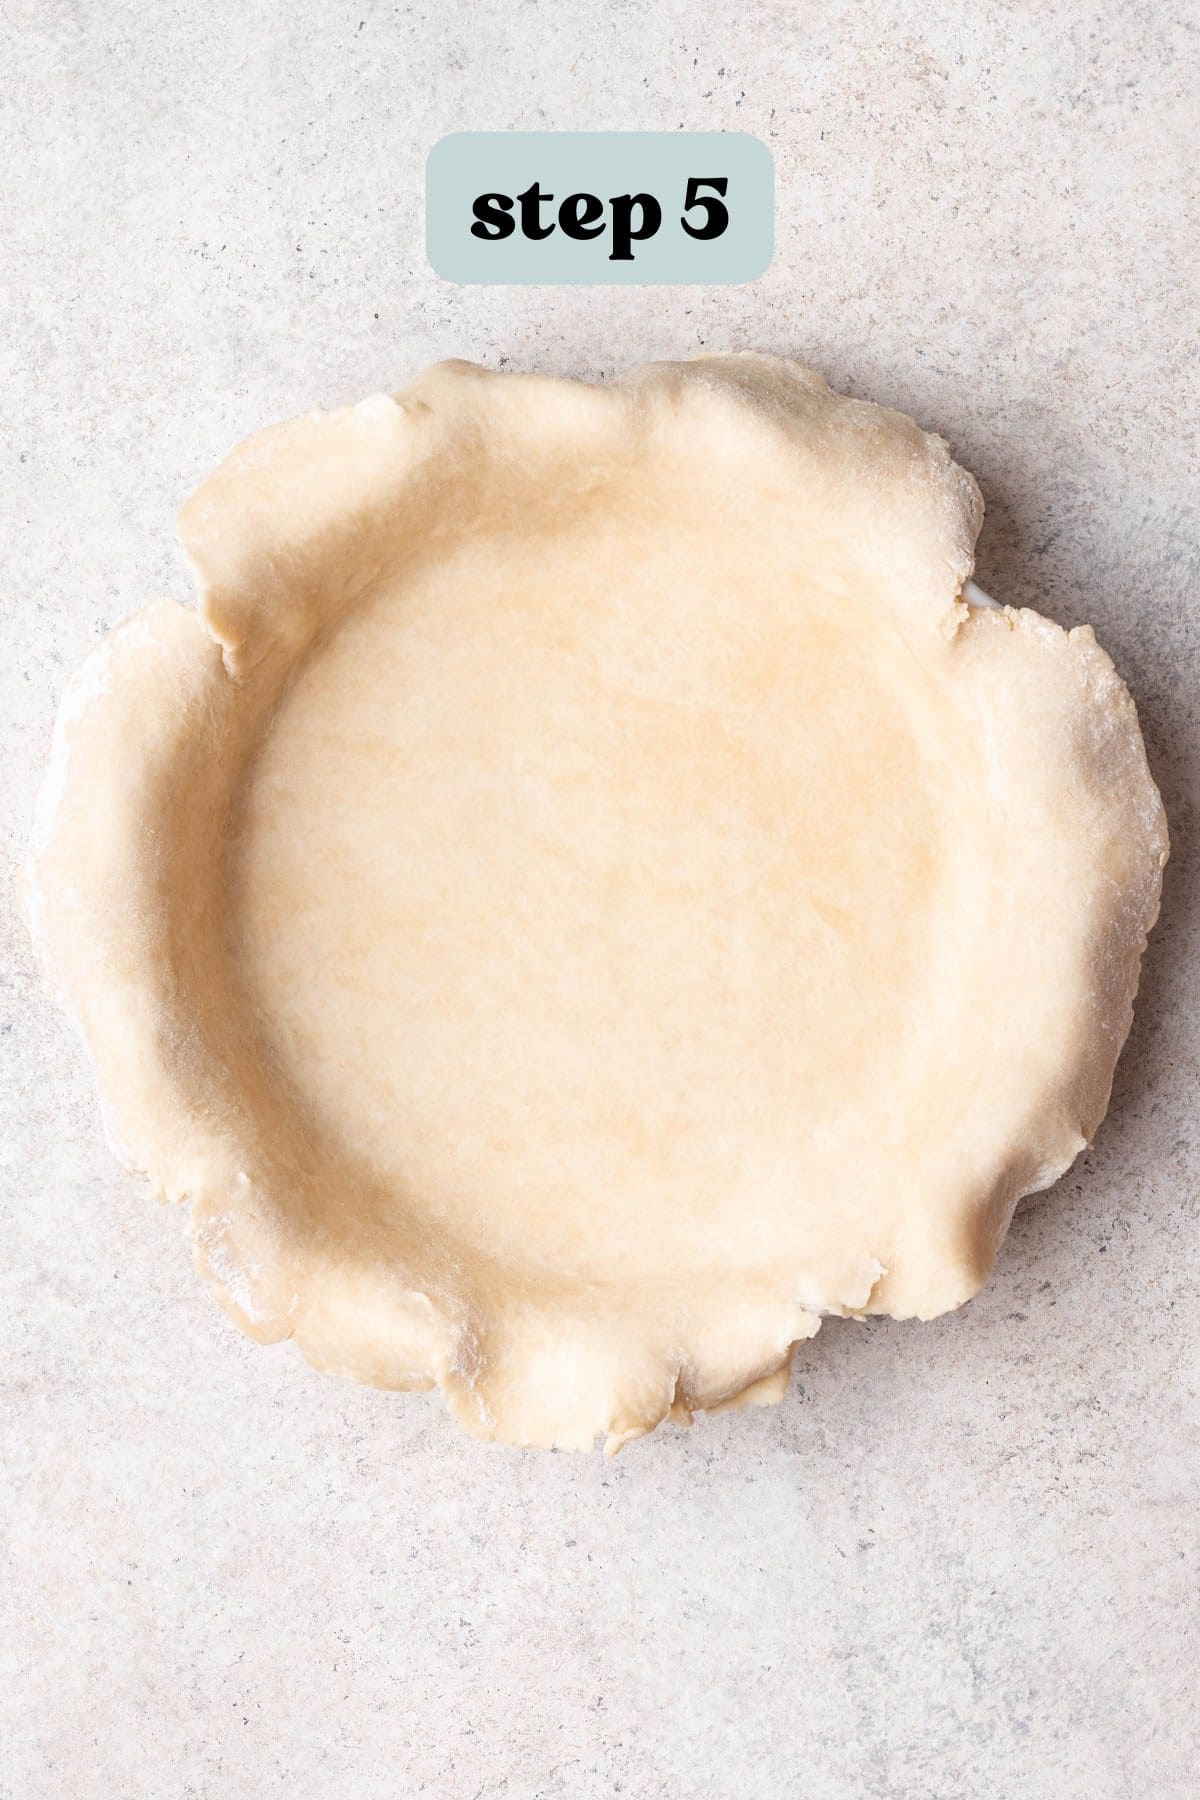
- Transfer to pie dish. Transfer the pie crust to a 9″ pie dish. This is easiest to do by wrapping the thin pie crust around the rolling pin, then gently rolling it back out to cover the pie dish. Using your fingers, carefully press the crust into the bottom of the dish and up the sides. There should be a nice overhang around the edges of the pie dish with no air bubbles in the crust.
- Trim the crust. Using kitchen shears, trim the dough as needed.
- Chill until ready to use. The next steps will depend on the recipe you are making. Depending on the recipe, the instructions may call for blind baking, filling the pie crust immediately, etc.
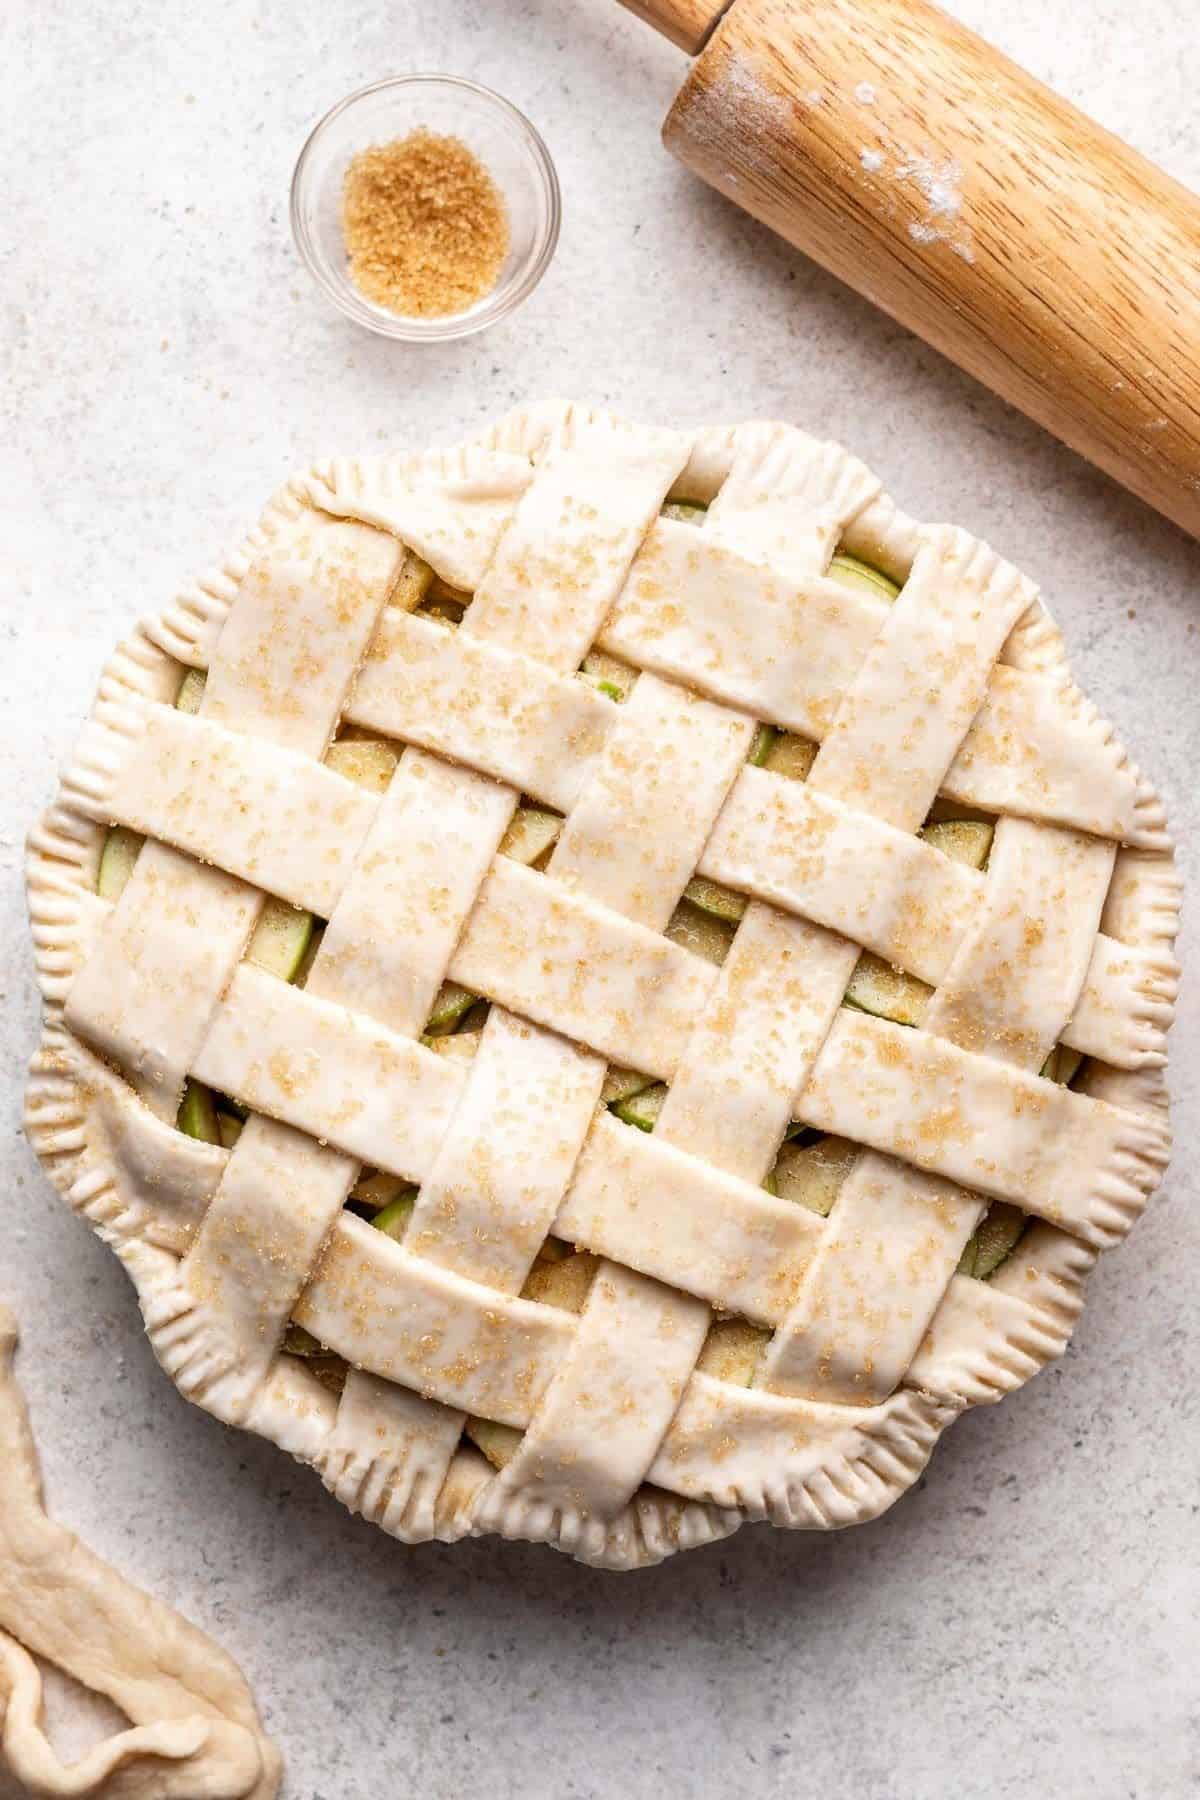
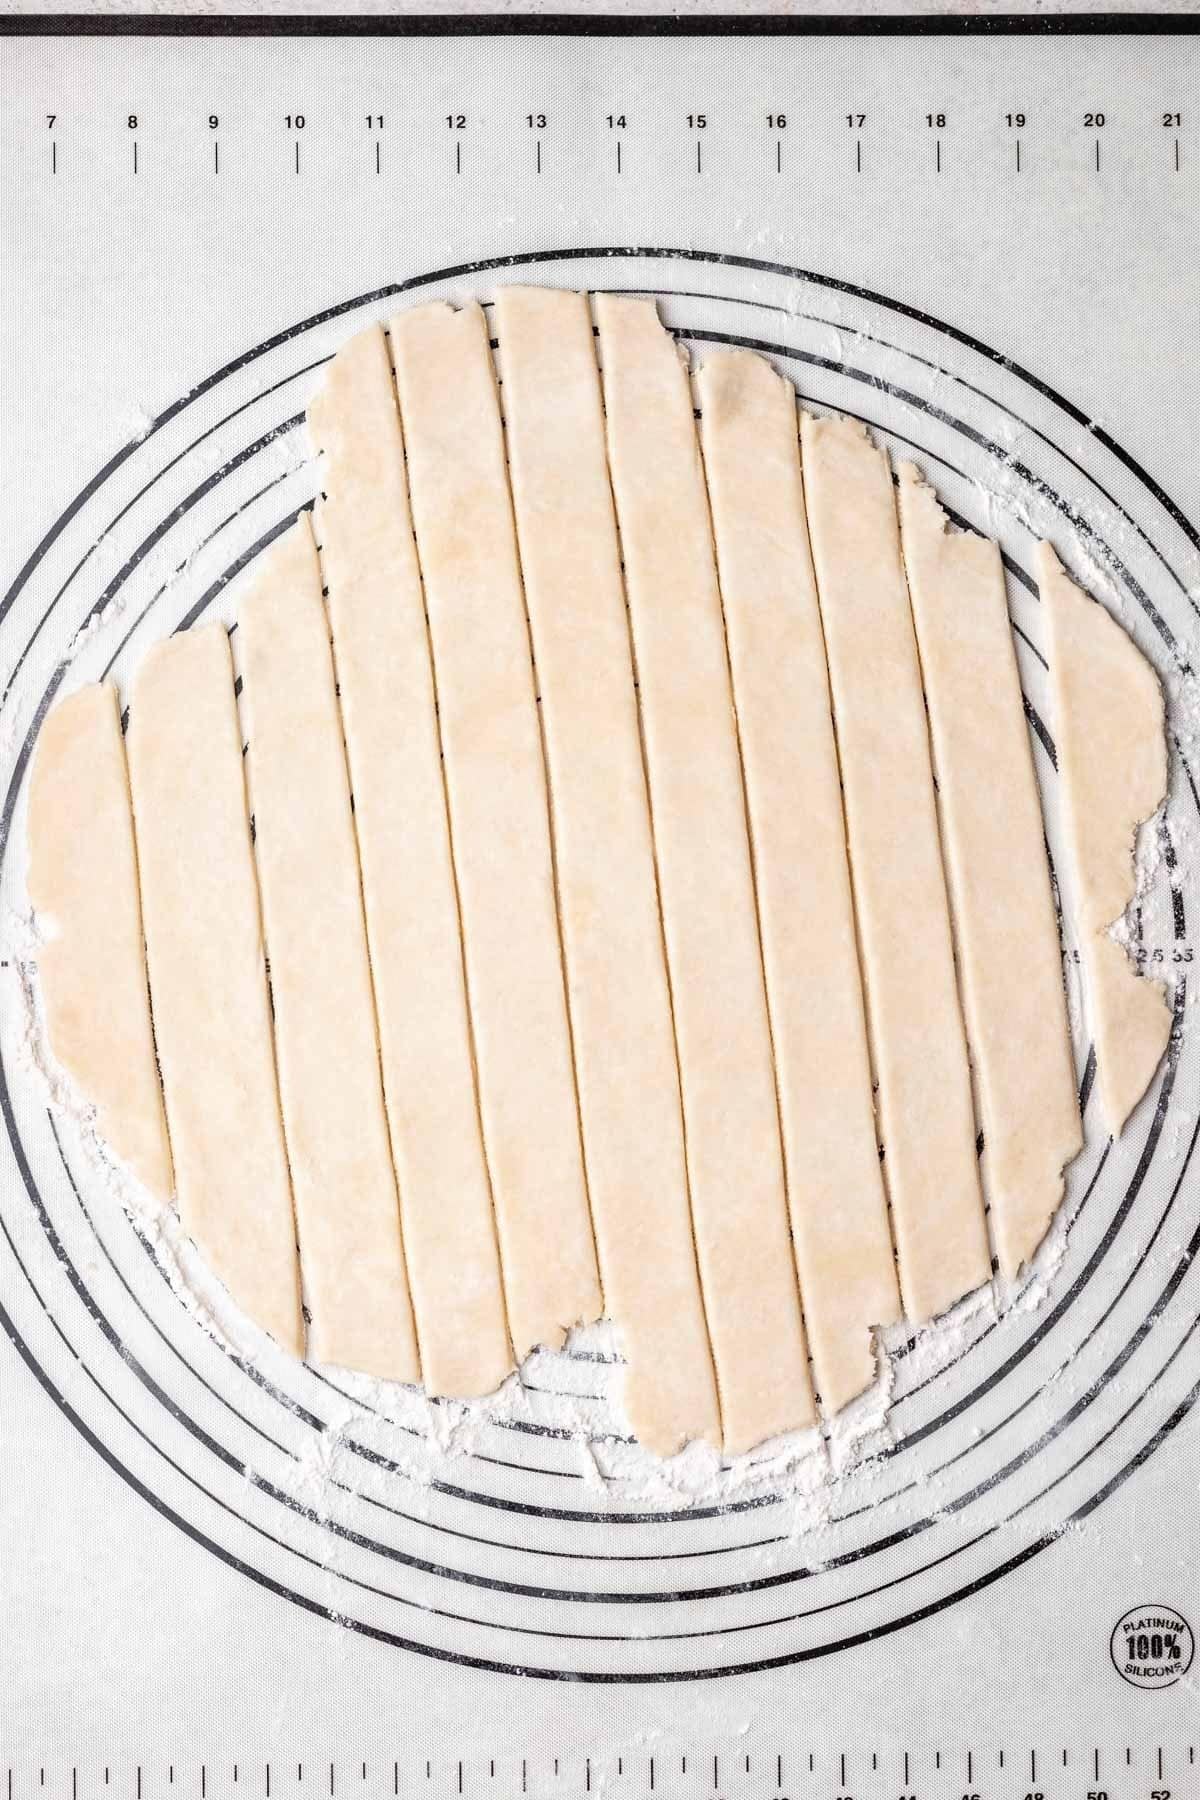
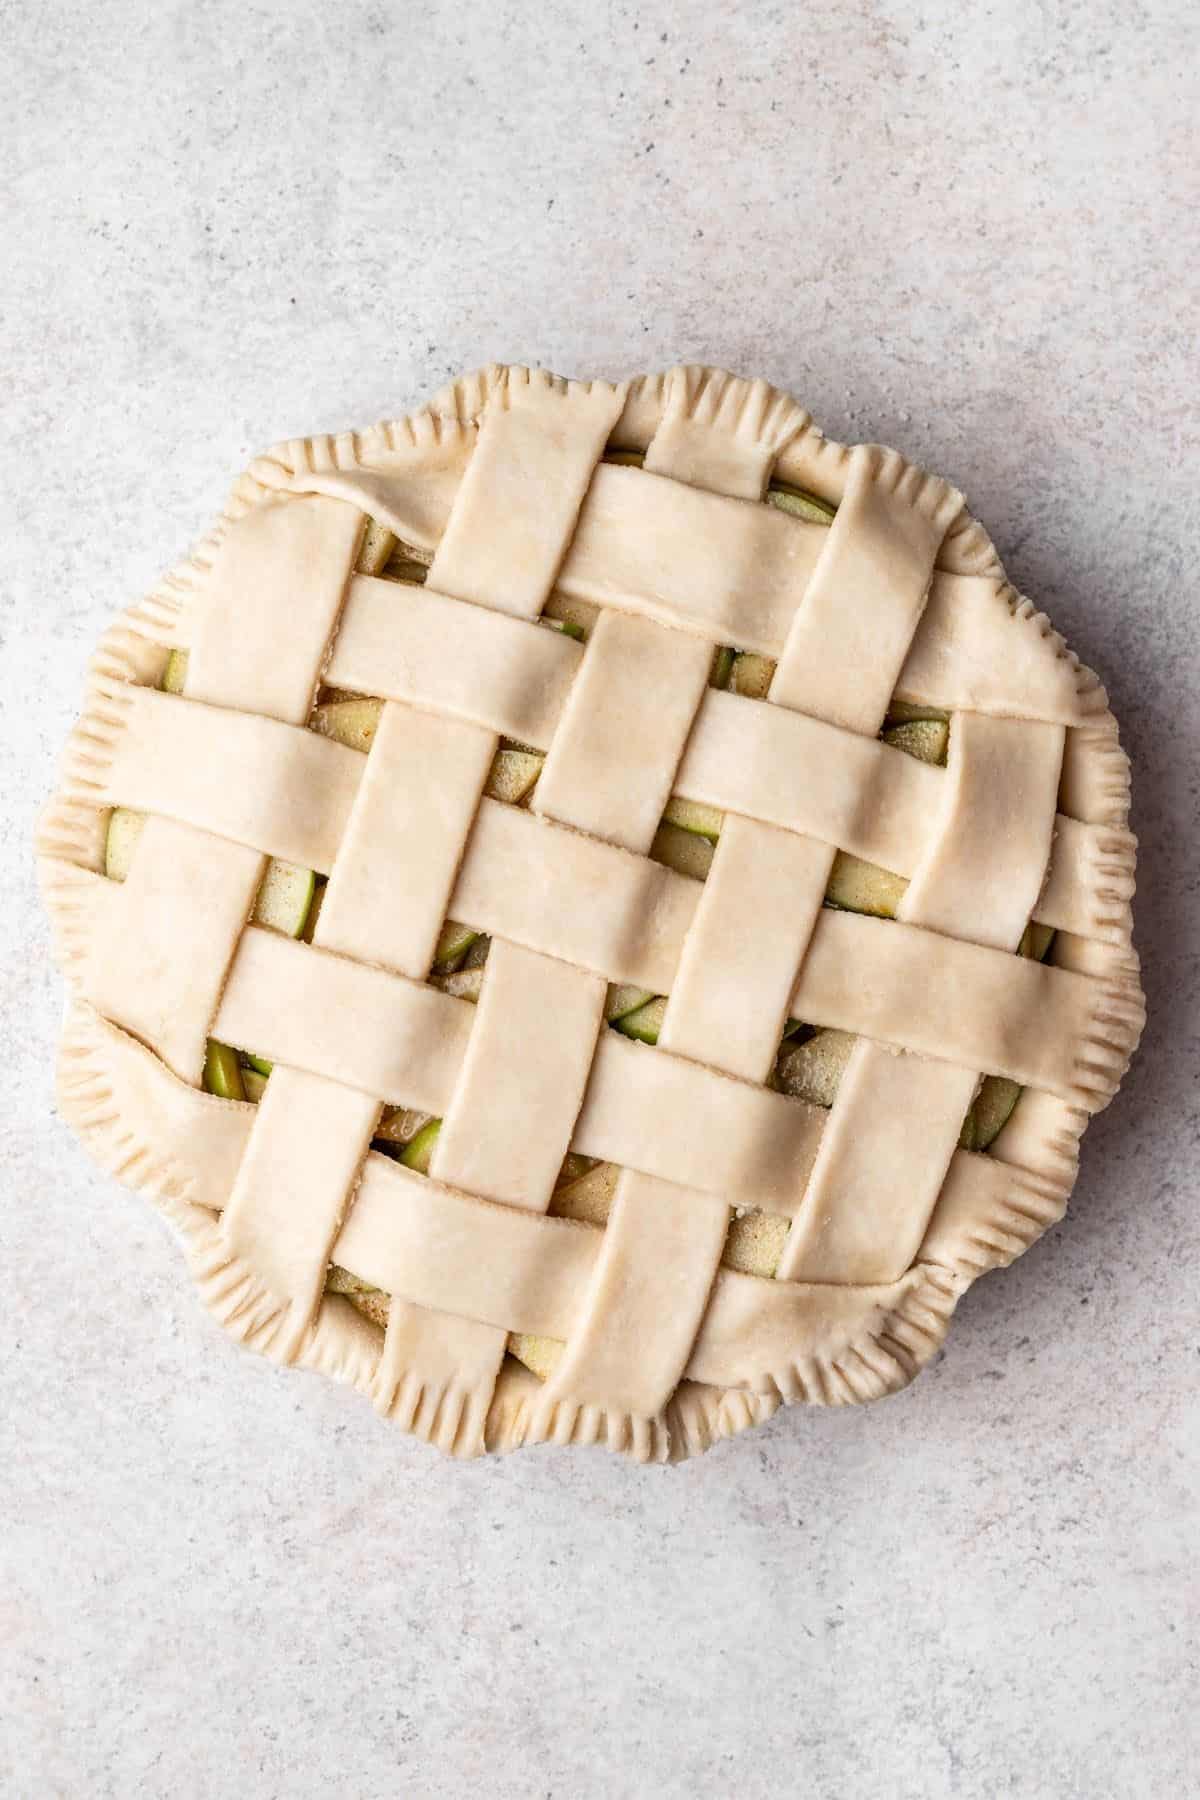
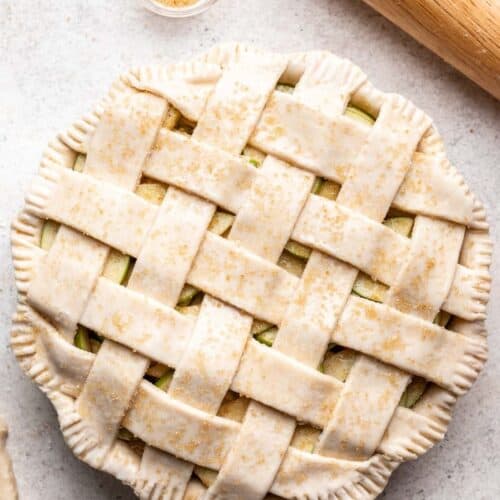
How to Make a Lattice Pie Crust
Making an apple pie? Give a lattice pie crust a try!
Follow the recipe steps above for rolling out the pie dough. Once 1/4″ thick and about 12″ in diameter, cut the crust into 10-12 long strips, about 1″ thick.
Then, because it is easier to show visually than it is to explain, I am going to link a quick and easy tutorial from Sally's Baking Addiction on How to Lattice Pie Crust.
Recipe FAQs
Can I freeze 3-Ingredient pie crust?
Absolutely! In fact, if you have a heavy holiday baking season coming up and want to be able to make pie from scratch without a ton of extra steps, I recommend making a few batches of crust in advance and freezing until ready to bake. Then, defrost overnight in the refrigerator then roll and bake!
For best results, I recommend wrapping the dough tightly in a few layers of plastic wrap, then placing in a freezer-safe bag for additional freezer burn protection. Freeze for up to 3 months.
Why isn't my crust flaky?
If your pie crust isn't soft, buttery and flaky after baking it is possible one of two things happened: Either the dough was too warm and the butter melted before baking. Or, not enough butter was used in the dough. This 3-ingredient pie crust MUST be made with 2 sticks of COLD butter.
This is NOT the recipe to make adjustments to try and make a healthier pie crust. If you are against using 2 sticks of butter, you're better off with a Vegan and Gluten-Free Pie Crust made with NO OIL.
Why is my pie crust ripping?
If when you are rolling out the dough it is tearing, it's likely not moist enough. To fix this re-ball up the dough and splash with a bit of additional cold water. Work the water into the dough to moisten it and help it from tearing.
Does adding sugar make a sweet pie crust?
No. If you add the sugar to the 3-ingredient pie crust, it will not make the pie crust noticeably sweet. It is still the perfect crust to use for your favorite savory pie recipes. The sugar simply encourages the pie crust to brown and become golden and also encourages the butter to melt and create flaky air pockets during baking.
Final Tips for Success
- If you do not have a pastry cutter, use your food processor. Many recipes call for using your hands to cut the butter into the dough. I find this to be difficult to do without warming up the butter. Additionally, it usually disperses the butter unevenly, leaving large clumps throughout (not ideal). If you do not have a pastry cutter, add the flour, salt, sugar (if using), and cubed butter to a large cup food processor and pulse until pea-sized pieces form.
- Use ice cold water. Before starting, I will fill a pyrex with water and ice cubes. Then, right before using, I will remove the ice cubes. Cold, room temperature butter simply won't cut it. It needs to be ICE cold!
- Do not make substitutions to the measurements. This is not the recipe to be making substitutions with and expect stellar results. Baking is precise and a perfectly flaky crust requires precise measurements.

3-Ingredient Pie Crust Recipe
Ingredients
- 3 cups (360 grams) all-purpose flour ($0.48)
- ½ teaspoon salt omit if using salted butter ($0.02)
- 1 cup (2 sticks) COLD cubed butter salted or unsalted, ($2.77)
- ½ cup ICE COLD water plus more as needed
- 1 tablespoon sugar optional ($0.03)
Instructions
- Mix the dry ingredients. In a large bowl, combine the flour, salt, and sugar, if using.
- Cut in cold cubes of butter. Add the cubed butter to the bowl, then using a pastry cutter, cut the butter into the flour until the texture resembles sand. A few larger pieces are okay, but you want it to be otherwise well dispersed.
- Add ice water. One tablespoon at a time, pour in the ice water. Using a wooden spoon or spatula, mix to combine until a crumbly dough forms with flecks of butter throughout. It should feel moist, but not overly wet. If the dough feels too dry, add additional water, 1 tablespoon at a time.
- Form into a dough ball. Turn the pie crust dough onto a clean work surface and gently work together with your hands until the dough comes together into a ball.
- Cut into 2 discs. Divide the dough into two even discs and wrap each in plastic wrap.
- Refrigerate overnight. Place the dough into the refrigerator and chill overnight or for an absolute minimum of 1 hour.
- Roll the pie crust 1/4" thick. After the dough has been sufficiently refrigerated, sprinkle a work surface with flour. Roll the chilled dough into a 12" circle, about 1/4" thick. This is easiest to do if you start with the rolling pin in the center of the dough, then roll out in all directions, turning the rolling pin as you go.
- Transfer to pie dish. Transfer the pie crust to a 9" pie dish. This is easiest to do by wrapping the thin pie crust around the rolling pin, then gently rolling it back out to cover the pie dish. Using your fingers, carefully press the crust into the bottom of the dish and up the sides. There should be a nice overhang around the edges of the pie dish with no air bubbles in the crust.
- Trim the crust. Using kitchen shears, trim the dough as needed.
- Chill until ready to use. The next steps will depend on the recipe you are making. Depending on the recipe, the instructions may call for blind baking, filling the pie crust immediately, etc.
- Make it dairy-free/vegan: Use dairy-free butter.
Notes
- If you do not have a pastry cutter, use your food processor. Many recipes call for using your hands to cut the butter into the dough. I find this to be difficult to do without warming up the butter. Additionally, it usually disperses the butter unevenly, leaving large clumps throughout (not ideal). If you do not have a pastry cutter, add the flour, salt, sugar (if using), and cubed butter to a large cup food processor and pulse until pea-sized pieces form.
- Use ice cold water. Before starting, I will fill a pyrex with water and ice cubes. Then, right before using, I will remove the ice cubes. Cold, room temperature butter simply won't cut it. It needs to be ICE cold!
- Do not make substitutions to the measurements.This is not the recipe to be making substitutions with. Baking is precise and a perfectly flaky crust requires precise measurements.
Disclaimer: The Nutritional Information provided for this recipe is only an estimate. The accuracy of the facts listed is not and cannot be guaranteed.
Did You Love This Recipe?
Rate the recipe here and make sure to leave a comment below!